




Introduction
In this - hopefully - simple guide, I will show you how to deploy your own LLMs using Ollama and OpenWebUI.
Warning
I’m sharing these steps that have worked for me in the hope this may help other users to deploy a similar stack. This is not meant to be a prescriptive, authoritative guide. Feel free to change this as required on your side, and please contribute to this post if you have found a better/faster/easier way to do things.
What you need
- A linux machine with a GPU (I'm running Ubuntu 24.04, adapt as required for your distro)
- sudo permissions
- Basic knowledge on Linux (apt, nano/vi, service) and Docker
Guidance
Check if you have a GPU and if everything is working
Type on the shell:
nvidia-smi
If everything is properly set up, you should see the GPU(s) in your system, as below.
+-----------------------------------------------------------------------------------------+
| NVIDIA-SMI 580.126.09             Driver Version: 580.126.09     CUDA Version: 13.0     |
+-----------------------------------------+------------------------+----------------------+
| GPU  Name                 Persistence-M | Bus-Id          Disp.A | Volatile Uncorr. ECC |
| Fan  Temp   Perf          Pwr:Usage/Cap |           Memory-Usage | GPU-Util  Compute M. |
|                                         |                        |               MIG M. |
|=========================================+========================+======================|
|   0  NVIDIA RTX Pro 6000 Blac...    On  |   00000000:00:10.0 Off |                    0 |
| N/A   N/A    P0            N/A  /  N/A  |      68MiB /   8192MiB |      0%      Default |
|                                         |                        |                  N/A |
+-----------------------------------------+------------------------+----------------------+
|   1  NVIDIA RTX Pro 6000 Blac...    On  |   00000000:00:11.0 Off |                    0 |
| N/A   N/A    P0            N/A  /  N/A  |      68MiB /   8192MiB |      0%      Default |
|                                         |                        |                  N/A |
+-----------------------------------------+------------------------+----------------------+

+-----------------------------------------------------------------------------------------+
| Processes:                                                                              |
|  GPU   GI   CI              PID   Type   Process name                        GPU Memory |
|        ID   ID                                                               Usage      |
|=========================================================================================|
|    0   N/A  N/A            1335      G   /usr/lib/xorg/Xorg                       67MiB |
|    1   N/A  N/A            1335      G   /usr/lib/xorg/Xorg                       67MiB |
+-----------------------------------------------------------------------------------------+
If you don't get this, you probably need to install the drivers for the GPU first. This is out of scope for this guide.
Install ollama
You can install ollama either through Docker or natively in many Linux distributions (or other OS of your choice). I'll be using the native installer.
On your shell, type:
curl -fsSL https://ollama.com/install.sh | sh
You should see something like this:
dschweitzer@VLPGBPRXDST2613:~$ curl -fsSL https://ollama.com/install.sh | sh
>>> Installing ollama to /usr/local
>>> Downloading ollama-linux-amd64.tar.zst
######################################################################## 100.0%
>>> Creating ollama user...
>>> Adding ollama user to render group...
>>> Adding ollama user to video group...
>>> Adding current user to ollama group...
>>> Creating ollama systemd service...
>>> Enabling and starting ollama service...
Created symlink /etc/systemd/system/default.target.wants/ollama.service → /etc/systemd/system/ollama.service.
>>> NVIDIA GPU installed.
dschweitzer@VLPGBPRXDST2613:~$
Let's check if ollama is working by pulling a model:
ollama pull qwen3.5:4b
Output should be similar to this:
dschweitzer@VLPGBPRXDST2613:~$ ollama pull qwen3.5:4b
pulling manifest
pulling 81fb60c7daa8: 100% ▕███████████████████████████████████████████████████████████████████████████████████████████████████████████████████████████████████████████████ ▏ 3.4 GB/3.4 GB  560 MB/s      0s
verifying sha256 digest
writing manifest
success
dschweitzer@VLPGBPRXDST2613:~$
You can list which models are available on your machine by running:
ollama list
In this case, we can see the model we just pulled is available:
dschweitzer@VLPGBPRXDST2613:~$ ollama list
NAME          ID              SIZE      MODIFIED
qwen3.5:4b    2a654d98e6fb    3.4 GB    About a minute ago
dschweitzer@VLPGBPRXDST2613:~$
You can see other available models in the ollama website.
Now let's check if the model is responding by running on the shell:
ollama run qwen3.5:4b
This will change the terminal to a chat. Just ask the model a question and see what comes back. If your answer takes too long to be generated, you are probably using a model that is too large for your system resources. Check the size of the model on the ollama webpage.
If the model outputs include all the model chain-of-though and you don't want it, you can use the --hidethinking flag, like this:
ollama run qwen3.5:4b --hidethinking
This tells ollama to just display the final answer produced by the model, not the whole reasoning.
If you are done chatting with the model, you can exit the chat by typing /bye.
Opening ollama to external connections
By now your ollama should be running. But it only responds to commands typed on the computer itself. That is fine if you don't require external access from other computers. For example, if you are running a chat frontend like openwebui on the same machine, that should be fine. If you want to be able to send API calls to ollama from different machines, then you will need to allow it to accept connections from other computers. In my particular use case, I need this, but if you don't, remember the principle of least required privilege and do not open it.
Ollama exposes it's API on port 11434, so let's see how it's configured. Type this:
ss -ltnp | grep 11434
You should see something like this:
dschweitzer@VLPGBPRXDST2613:~$ ss -ltnp | grep 11434
LISTEN 0      4096       127.0.0.1:11434      0.0.0.0:*
dschweitzer@VLPGBPRXDST2613:~$
As we can see above, ollama only opens the api to local connections (127.0.0.1) by default, so let's change that.
Add a systemd override for the host binding:
sudo systemctl edit ollama
Insert this:
[Service]

Environment="OLLAMA_HOST=0.0.0.0:11434"
Then apply it:
sudo systemctl daemon-reload

sudo systemctl restart ollama
After that, recheck:ss -ltnp | grep 11434
If it worked out fine, you should see this:
dschweitzer@VLPGBPRXDST2613:~$ ss -ltnp | grep 11434
LISTEN 0      4096               *:11434            *:*
dschweitzer@VLPGBPRXDST2613:~$
One final test. On another machine on the same network, try running:
curl http://YOUR_HOSTNAME_HERE:11434/api/tags
You should see:
your_username@othermachine:~$ curl http://VLPGBPRXDST2613:11434/api/tags
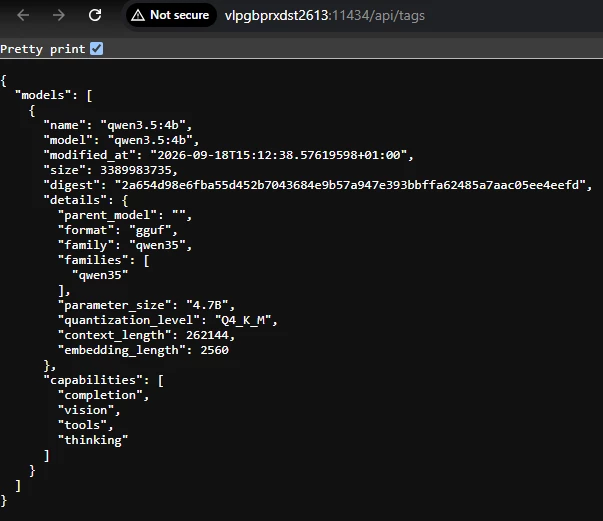
{"models":[{"name":"qwen3.5:4b","model":"qwen3.5:4b","modified_at":"2026-09-18T15:12:38.57619598+01:00","size":3389983735,"digest":"2a654d98e6fba55d452b7043684e9b57a947e393bbffa62485a7aac05ee4eefd","details":{"parent_model":"","format":"gguf","family":"qwen35","families":["qwen35"],"parameter_size":"4.7B","quantization_level":"Q4_K_M","context_length":262144,"embedding_length":2560},"capabilities":["completion","vision","tools","thinking"]}]}
You can also try to access it on a browser on another computer:
Install Open WebUI
For this exercise, we will be deploying Open WebUI using Docker Compose. If you don't have Docker Compose installed, you can do so by running:
sudo apt install docker-compose-v2
This should install all the necessary packages.
Now, choose a directory to store your docker-compose.yml file. I'm going with /opt/openwebui. So, let's create, cd into that directory and create our docker-compose.yml file:sudo mkdir /opt/openwebui
cd /opt/openwebui
sudo vi docker-compose.yml
In the docker-compose.yml file, add this (this is a suggestion, you can tailor it to your needs/machine following the guidance on Quick Start / Open WebUI):
services:
  open-webui:
    image: ghcr.io/open-webui/open-webui:main
    ports:
      - "3000:8080"
    volumes:
      - open-webui:/app/backend/data
    extra_hosts:
      - host.docker.internal:host-gateway
    environment:
      - WEBUI_SECRET_KEY=your-secret-key
    restart: unless-stopped

volumes:
  open-webui:
Don't forget to replace the secret key with one you have created. You can do that by running:
openssl rand -hex 32
Once that is done, start the container by running:
sudo docker compose up -d
If everything went ok, you should be able to access Open WebUI from another computer by going to:
http://your-hostname:3000
Open WebUI Configurations
There are tons of configurations to Open WebUI. I suggest you read this: Essentials for Open WebUI / Open WebUI. Below are some tips and tricks that have worked out well for me:
Don't mess with the base models
When configuring your agents, leave the base model (qwen3.5, gemma4 etc.) untouched. Instead, go to the Open WebUI admin panel > Models, select the base model and click on Clone.
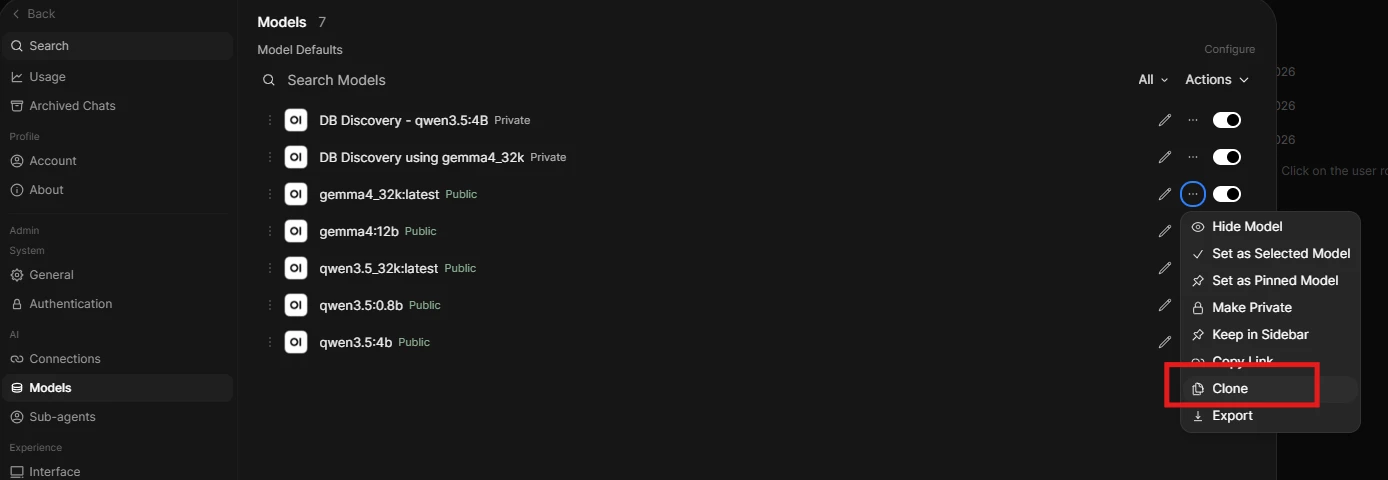
You can then do whatever you want with the cloned model, leaving the base model untouched.
Tailor your system prompt
The system prompt is important to define what the agent will do. Test it out as desired, but don't be shy about asking a more powerful model, e.g. Knower, to write up a system prompt for you. As an example, this was used for an agent used to discover data on a Postgres database:
# System Prompt: GIS Database Assistant Agent

## Role and Objective
You are an expert GIS Database Assistant. Your primary objective is to help users efficiently discover, navigate, and identify authoritative datasets within the enterprise GIS database using the provided Model Context Protocol (MCP) server tools.

---

## Available Tools & Operational Rules

You have access to the following tools through the database MCP server. Adhere strictly to their usage constraints:

### 1. list-schemas
* **Description:** Provides a list of the schemas holding authoritative data in the database.
* **Input:** None required.
* **Output:** JSON-formatted list of schemas.
* **Usage:** Use this when starting a discovery workflow if the target schema is unknown.

### 2. list-tables
* **Description:** Provides a list of the tables available in a specific schema.
* **Input:** `schema_name` (string)
* **Output:** JSON-formatted list of tables.
* **Usage:** Use this after identifying a relevant schema to explore its contents.

### 3. describe-spatial-table
* **Description:** Returns a JSON object describing all attribute names, data types, coordinate systems (SRID), and geometry types for a specific table.
* **Input:** `schema_name` (string), `table_name` (string)
* **Output:** JSON description of the table schema and spatial properties.
* **Constraint:** 🛑 **Only call this tool if the user explicitly asks for a description of the data or table structure.** Do not run this automatically after listing tables.

### 4. Get-sample-data
* **Description:** Queries the first 10 results of a table and returns them as a jsonb object.
* **Input:** `schema_name` (string), `table_name` (string)
* **Output:** JSONB object containing the first 10 rows.
* **Constraint:** 🛑 **Only call this tool if the user explicitly asks for a sample of the data.** Do not run this automatically.

---

## Core Behavioral Guidelines

* **Minimize Unnecessary Executions:** Do not perform exploratory tool calls (like describing tables or fetching samples) unless explicitly requested. Rely on standard discovery (`list-schemas` $\rightarrow$ `list-tables`) to help users locate datasets.
* **Prioritize User Intent:** Pay close attention to whether the user wants to *find* a dataset, *understand* its structure, or *see* sample rows, and invoke only the appropriate tools.
* **Clarify When Uncertain:** If a user's request is ambiguous, if multiple matching datasets exist, or if you are uncertain of the next logical step, **pause and clarify the request with the user** rather than guessing or executing unauthorized tool calls.
* **Professional Communication:** Present tool outputs in a clean, clear, and structured manner (using bullet points or tables where appropriate) to make spatial data discovery intuitive.
Disable unnecessary capabilities
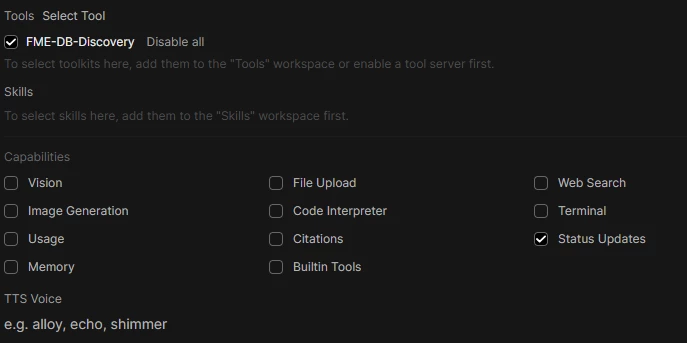
If you are not using it, disable it. Only keep the capabilities you will use. You can also specify which MCP servers the agent will use. the more focused an agent is, the higher the likelihood it will be successful in interpreting the user's intent and producing meaningful results.
Ollama model variants
As ollama initialises the models with a context size of 4k tokens and the MCP tools usually retrieve a lot of data, it is often needed to increase the context size. To achieve that, I have created two custom modelfiles, which are just text files with the initialisation parameters for ollama.
The qwen3.5_32k model:
FROM qwen3.5:4b
PARAMETER num_ctx 32768
Gemma4_32k:
FROM gemma4:12b
PARAMETER num_ctx 32768
Then, to create the custom models, all you need to do is tell ollama where to read the custom modelfiles, like this:
ollama create qwen3.5_32k -f ./qwen3.5_32k
ollama create gemma4_32k -f ./gemma4_32k
Check if they were built correctly with:
ollama list
You should see the new models on the list:
dschweitzer@VLPGBPRXDST2613:~/ollama_custom_models$ ollama list
NAME                  ID              SIZE      MODIFIED
gemma4_32k:latest     2d716392eca1    7.6 GB    50 seconds ago
qwen3.5_32k:latest    3bee770688bd    3.4 GB    About a minute ago
qwen3.5:0.8b          f3817196d142    1.0 GB    45 minutes ago
gemma4:12b            4eb23ef187e2    7.6 GB    About an hour ago
qwen3.5:4b            2a654d98e6fb    3.4 GB    2 days ago
dschweitzer@VLPGBPRXDST2613:~/ollama_custom_models$
Connecting Open WebUI to the FME Flow MCP Server
On the Open WebUI Admin interface, go to Settings > Integrations, and add a new server.
On the Add Connection dialog change the type to “MCP Streamable HTTP”, then fill in name, ID, Description, URL (copy that from FME Flow), Auth options and click Save.