Solved

Changing the style of a specific, persistent cell in ExcelStyler


Forum|alt.badge.img

Hi there,

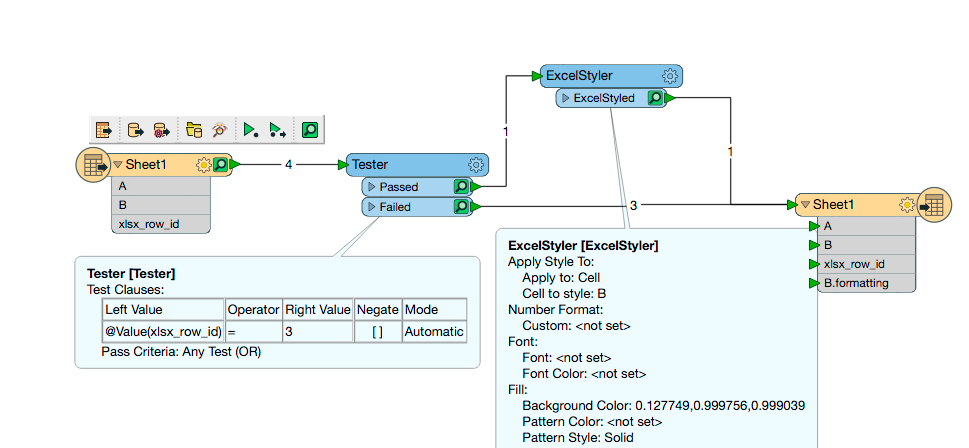
I'm completely baffled about how the "Apply to: Cell" function works in the ExcelStyler transformer.

The explanation of how this works (at least to my untrained eye) seems pretty confusing:

"Specifies which cells will be styled. This option allows selection of attributes, which correspond to columns in Excel, to style for each incoming feature, which each correspond to a row in Excel. The result is that the intersection of the columns and the rows are the cells that will be styled. Note that this can only be set when applying formatting to cells."

I don't want to involve any attributes into the equation, but instead just want to always style "C7" in a specific way, for example. Is there any way I can do this? I have several cells to style individually, but how to set up these attributes to represent the rows and columns (I guess?) is blurry to me. There will be no dynamic values or anything, "C7" will be styled in one way and always be that one style.

Thanks in advance for any help.

Best answer by hollyatsafe

Hi @robbie_botha,

1. Expose the xlsx_row_id in the FormatAttributes of your Reader (or you just need an ID attribute that indicates the row so you could use a counter etc to create this)

2. add a Tester to keep only the row you want to Style (ie xlsx_row_id = 7)

3. add an ExcelStyler to the Passed port of your tester and set Apply to Cell and Cell to Style as the Column (C)

4. Route both the ExcelStyler and the Failed port of the Tester to your Excel Writer.

Workspace:

Output:

If you would like to see support in the ExcelStyler to specify a specific cell then please post an idea here: https://knowledge.safe.com/content/idea/post.html

View original
Did this help you find an answer to your question?

2 replies

Forum|alt.badge.img+2
  • Best Answer
  • August 23, 2018

Hi @robbie_botha,

1. Expose the xlsx_row_id in the FormatAttributes of your Reader (or you just need an ID attribute that indicates the row so you could use a counter etc to create this)

2. add a Tester to keep only the row you want to Style (ie xlsx_row_id = 7)

3. add an ExcelStyler to the Passed port of your tester and set Apply to Cell and Cell to Style as the Column (C)

4. Route both the ExcelStyler and the Failed port of the Tester to your Excel Writer.

Workspace:

Output:

If you would like to see support in the ExcelStyler to specify a specific cell then please post an idea here: https://knowledge.safe.com/content/idea/post.html


Forum|alt.badge.img

Hi @hollyatsafe,

This does indeed work, and in reality I already did it the way you suggested before I even posted this question.

My issue was that my writer was set on manual, so the attributes like "C.formatting" was not being preserved. I guess that is the confusing part, that those invisible attributes need to be present, because just adding "C" to the output keeps generating unformulated sheets.

Well at least now I know. Thanks a lot!


Cookie policy

We use cookies to enhance and personalize your experience. If you accept you agree to our full cookie policy. Learn more about our cookies.

 
Cookie settings