Solved

How to write all raster properties to excel file?


makt
Contributor
Forum|alt.badge.img+1
  • Contributor
I'm experimenting with incorporating Excel workflows into my FME workspaces and am stuck.


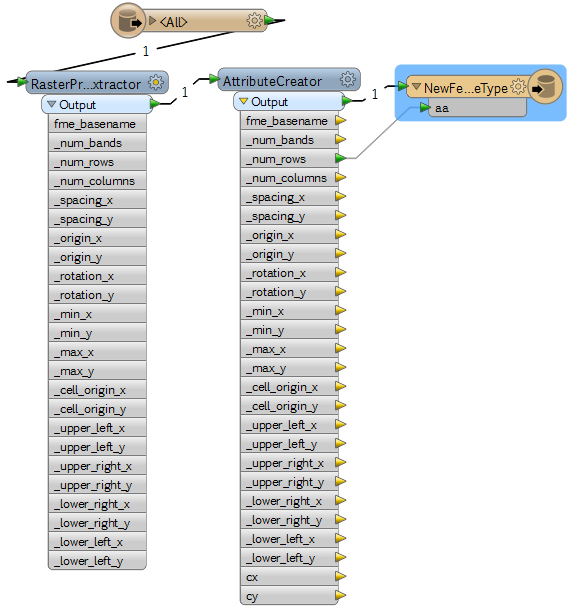
My workspace reads in a raster, then I get raster properties using RasterPropertiesExtractor, then I create a few more attributes with AttributeCreator, and finally I want to write to an Excel file with each attribute name in the first column and its value in the second column.


I tried many settings under "format parameters" in the excel writer, but with no luck. The main problems I am having is that 1) nothing seems to write to the excel cells no matter what settings I have under "format parameters", and 2) the image of the raster is inserted into the excel file, which I don't know how to stop.


I'm obviously missing a few things in my first attempt...


Best answer by takashi

1) The AttributeExploder transformer can be used to transform the feature into multiple features containing pair of attribute (property) name and value. And also maybe you will have to remove features which contain unnecessary attribute names (e.g. fme_***).


2) You can control width of each column by modifying "Width" in "User Formats" page of the writer feature type.


View original
Did this help you find an answer to your question?
This post is closed to further activity.
It may be a question with a best answer, an implemented idea, or just a post needing no comment.
If you have a follow-up or related question, please post a new question or idea.
If there is a genuine update to be made, please contact us and request that the post is reopened.

5 replies

takashi
Contributor
Forum|alt.badge.img+19
  • Contributor
  • May 12, 2014
Hi,


1) You will have to configure "User Attributes" of the Excel writer feature type.


Right-click on the writer feature type to show the shotcut menu > select "Copy Attributes From Transformer" > select AttributeCreator.


Open Feature Type Properties dialog, go to User Attributes page, edit attribute Types etc.


Go to Format Parameters page, check "Output Field Names" is set as "Yes" (default).


2) Try using the GeometryRemover to remove the raster before writing.


Takashi

makt
Contributor
Forum|alt.badge.img+1
  • Author
  • Contributor
  • May 12, 2014
Hi Takashi - excellent tips - it almost works as expected:


1) currently the names are inserted as columns and the values are inserted in the next row. How can I transpose this in FME so that each property name is a new row in the first column and the value be in the next column? Couldn't find any writer format parameters that would do this, do I need an additional transformer


2) possibly related to 1) - the output excel table has very very wide columns - is there a way to control this ?

takashi
Contributor
Forum|alt.badge.img+19
  • Contributor
  • Best Answer
  • May 13, 2014
1) The AttributeExploder transformer can be used to transform the feature into multiple features containing pair of attribute (property) name and value. And also maybe you will have to remove features which contain unnecessary attribute names (e.g. fme_***).


2) You can control width of each column by modifying "Width" in "User Formats" page of the writer feature type.


gio
Contributor
Forum|alt.badge.img+15
  • Contributor
  • May 13, 2014
Use atributeexploder.


1stColumn = @Value(_attr_name)


2ndColumn = @Value(_attr_value)


makt
Contributor
Forum|alt.badge.img+1
  • Author
  • Contributor
  • May 15, 2014
Got it working - thanks guys.


Gio- I tried using your formulas but it results in a red cog in the AttributeExploder (I'm not sure if that is where those formulas are meant to go?)


Cookie policy

We use cookies to enhance and personalize your experience. If you accept you agree to our full cookie policy. Learn more about our cookies.

 
Cookie settings