Question

Create TMS tiles from tiled source rasters using WebMapTiler


Badge +5

I have a directory structure containing source raster tiles (512x512 pixel png files) in TMS (XYZ) format at level 10. These have been provided to me by a third-party.

From these I'd like to generate levels 9 & 8 so additional layers can be shown in a leaflet app. I thought FME and the WebMapTiler would be the answer, but I'm struggling to get this working.

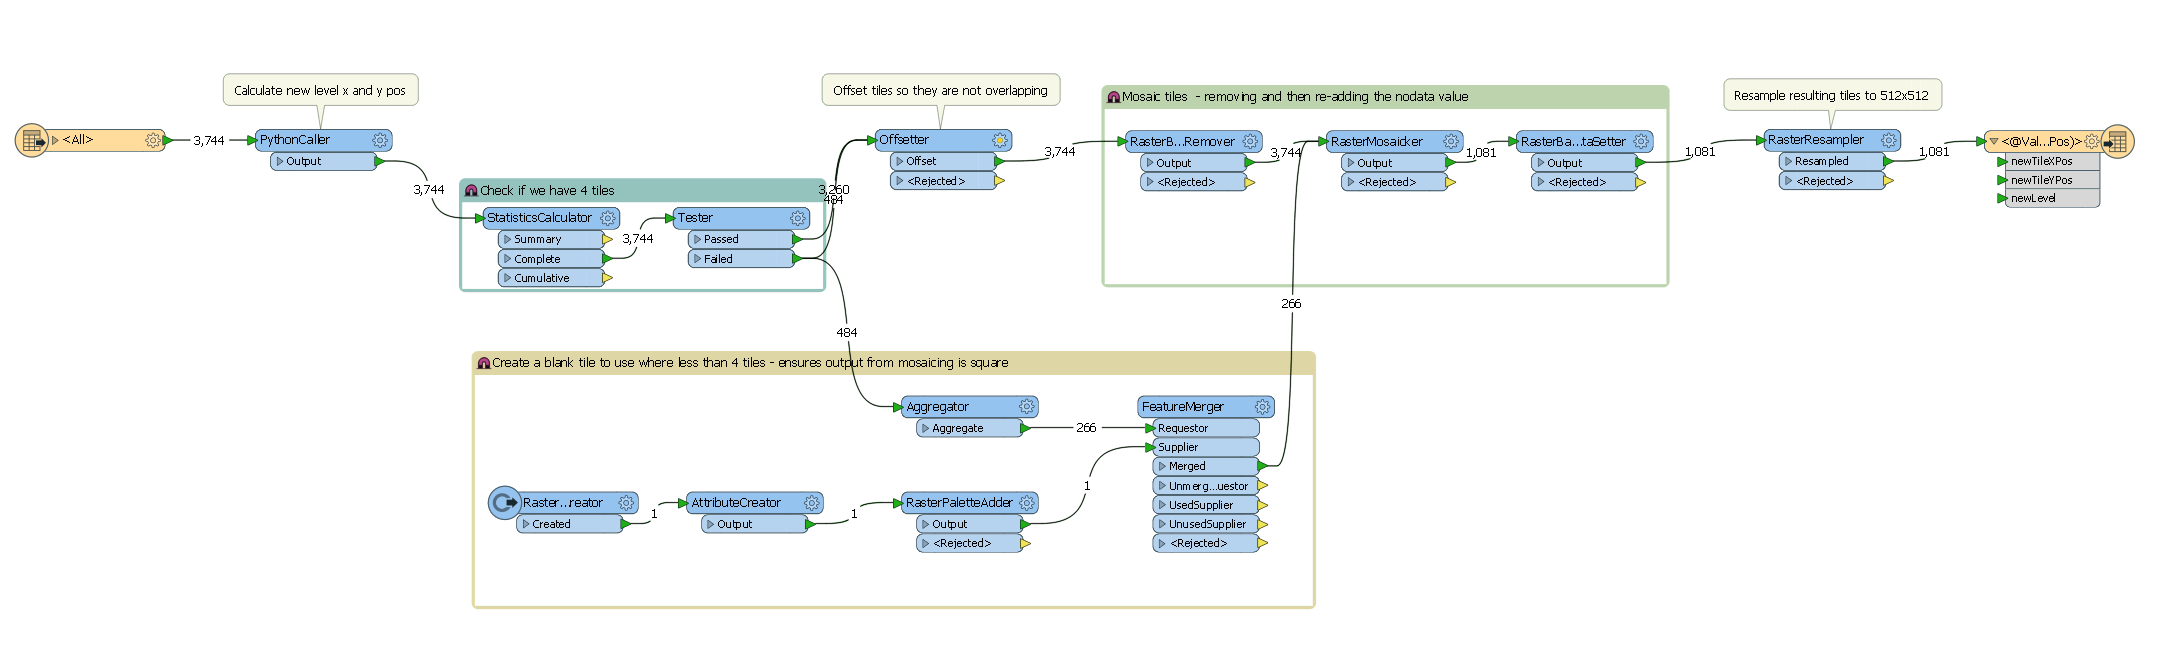
So far I have the following in workbench:

  1. A PNGRASTER reader that reads all the source files from the existing directory structure.
  2. A PythonCaller to calculate the bounding coordinates of the source tiles using a python function from here - https://wiki.openstreetmap.org/wiki/Slippy_map_tilenames.
  3. A RasterGeoreferencer to georeference the rasters usign the above coordinates.
  4. A RasterMosaicker to generate a single raster.
  5. A WebMapTiler (set to GlobalCRS84Scale, Minimum Zoom=8, Maximum Zoom=10) to generate the raster tiles at level 10, 9 & 8.
  6. A PNGRASTER writer with the name set as the Y (row) attribute and a fanout expression of @Value(out_tile_level)\\@Value(out_tile_x) to set the directory structure as level\\X

It's almost working, but I'm having the following issues:

  • The performance is very poor to generate approx 1800 tiles.
  • The directories for X don't appear to be correct (e.g. the ones for level 10 aren't the same as the source)

Does anyone have any ideas or perhaps a different approach with FME to acheive this?

Regards

John


8 replies

Userlevel 2
Badge +17

Hi @john_gis4busine, I guess that the geo referencing process could be the bottle-neck in the performance.

If the tile index (x, y) for each source tile in zoom level 10 is known, you can calculate tile index for zoom level 9 or 8, move them appropriately without geo referencing, and then mosaic them grouping by new tile index.

For example, you can calculate tile index in zoom level 9 with these math expressions. Assume that (xN, yN) indicate the tile index in zoom level N.

x9 = @floor(x10 / 2)
y9 = @floor(y10 / 2)

Next, offset the original 512x512 image with the Offsetter.

X Offset: 512 * (x10 % 2)
Y Offset: -512 * (y10 % 2)

You can then mosaic them for each group of (x9, y9), and finally modify the resolution with the RasterResampler if necessary.

Note that a new tile image in zoom level 9 should consist of 4 original images in zoom level 10. You will have to add a process that supplies missing parts if a new image won't be filled with original images entirely.

By the way, you can also specify option parameters 'minNativeZoom', 'maxNativeZoom' and 'tileSize' to the Leaflet tile layer object. Depending on the situation, it may not be essential to create a new tile dataset.

tileLayer = L.tileLayer(<url template>, {
    minZoom : 8,
    maxZoom : 10,
    minNativeZoom : 10,
    maxNativeZoom : 10,
    tileSize : 512
});
Badge +5

Thanks @takashi, that's very useful. I will look into whether we can just serve up the tiles at different resolutions in leaflet with the minNativeZoom and maxNativeZoom options.

Interestingly it not the georeferencing causing the performance issues, since the workbench runs in minutes if I georeference and then use RasterMosiacker to create a single image. It's definitely the WebMapTiler and I suspect something to do with the fanout the on the writer to get the correct directory structure. It's consuming a lot of memory, which suggests it holding the tiles in memory before writing.

Badge +5

Hi @john_gis4busine, I guess that the geo referencing process could be the bottle-neck in the performance.

If the tile index (x, y) for each source tile in zoom level 10 is known, you can calculate tile index for zoom level 9 or 8, move them appropriately without geo referencing, and then mosaic them grouping by new tile index.

For example, you can calculate tile index in zoom level 9 with these math expressions. Assume that (xN, yN) indicate the tile index in zoom level N.

x9 = @floor(x10 / 2)
y9 = @floor(y10 / 2)

Next, offset the original 512x512 image with the Offsetter.

X Offset: 512 * (x10 % 2)
Y Offset: -512 * (y10 % 2)

You can then mosaic them for each group of (x9, y9), and finally modify the resolution with the RasterResampler if necessary.

Note that a new tile image in zoom level 9 should consist of 4 original images in zoom level 10. You will have to add a process that supplies missing parts if a new image won't be filled with original images entirely.

By the way, you can also specify option parameters 'minNativeZoom', 'maxNativeZoom' and 'tileSize' to the Leaflet tile layer object. Depending on the situation, it may not be essential to create a new tile dataset.

tileLayer = L.tileLayer(<url template>, {
    minZoom : 8,
    maxZoom : 10,
    minNativeZoom : 10,
    maxNativeZoom : 10,
    tileSize : 512
});
Thanks @takashi, that's really useful. I will check if we can just serve up the existing tiles at different levels in leaflet using the minNativeZoom and maxNativeZoom options. 


Interestingly the bottleneck in the workbench isn't the georeferencing. If I remove/disable the WebMapTiler and direct the output from the RasterMosaicker directly to the writer to get a single image, this completes in minutes. I suspect the issue is with the WebMapTiler in combination with the fanout expression, which I think is causing FME to hold lots of rasters in memory.


Badge +5

The WebMapTiler appears to be very slow, even without a fanout. So I decided to use the approach suggested by @takashi. I've now got this working in FME and am able to generate the next level of tiles (e.g. 9) from the previous level (e.g. 10) as follows:

  1. Use a PythonCaller to calculate the next level tile x and y index position and image offsets;
  2. Test whether there are 4 source tiles in each resulting new x and y index;
  3. If there are less than 4 tiles - a blank image is created with 0s that covers the 4 tiles (i.e. is 1024x1024) with the same x & y tile index;
  4. All existing tiles are offet using the Offsetter (otherwise they would overlay each other);
  5. The existing tiles and blank tiles (see 3) are put through the RasterMosaicker, grouping on the tile index and specifying "Maximum" for overlapping values. This ensures that genuine orginal tiles overlay any blank tiles.
  6. The resulting new tiles are resampled using the RasterResampler to the required image size (512x512).
  7. A dataset fanout is used to create the directory structure for TMS (i.e. <level>\\<x>) and the file name is set to the y index.

This process takes a matter of minutes to run and the resulting tile levels have been tested in leaflet an are working nicely.

Many thanks to @takashi for the tips!

Badge +22

Thanks @takashi, that's very useful. I will look into whether we can just serve up the tiles at different resolutions in leaflet with the minNativeZoom and maxNativeZoom options.

Interestingly it not the georeferencing causing the performance issues, since the workbench runs in minutes if I georeference and then use RasterMosiacker to create a single image. It's definitely the WebMapTiler and I suspect something to do with the fanout the on the writer to get the correct directory structure. It's consuming a lot of memory, which suggests it holding the tiles in memory before writing.

Agreed that the bottleneck in this scenario is almost certainly the fanout on the writer. Have you tried using a FeatureWriter instead of the PNGWriter? You can create an attribute to hold the full directory $(OutputDirRoot)\\@Value(out_tile_level)\\@Value(out_tile_x) and set the Dataset parameter to that, and the Raster File Name parameter to the Y attribute.


Badge +1

The WebMapTiler appears to be very slow, even without a fanout. So I decided to use the approach suggested by @takashi. I've now got this working in FME and am able to generate the next level of tiles (e.g. 9) from the previous level (e.g. 10) as follows:

  1. Use a PythonCaller to calculate the next level tile x and y index position and image offsets;
  2. Test whether there are 4 source tiles in each resulting new x and y index;
  3. If there are less than 4 tiles - a blank image is created with 0s that covers the 4 tiles (i.e. is 1024x1024) with the same x & y tile index;
  4. All existing tiles are offet using the Offsetter (otherwise they would overlay each other);
  5. The existing tiles and blank tiles (see 3) are put through the RasterMosaicker, grouping on the tile index and specifying "Maximum" for overlapping values. This ensures that genuine orginal tiles overlay any blank tiles.
  6. The resulting new tiles are resampled using the RasterResampler to the required image size (512x512).
  7. A dataset fanout is used to create the directory structure for TMS (i.e. <level>\\<x>) and the file name is set to the y index.

This process takes a matter of minutes to run and the resulting tile levels have been tested in leaflet an are working nicely.

Many thanks to @takashi for the tips!

John,


Any chance you can share this workspace? I'm trying to produce tiles for a huge dataset and I'm running into significant bottlenecks.


Your approach looks promising!

Badge +5

John,


Any chance you can share this workspace? I'm trying to produce tiles for a huge dataset and I'm running into significant bottlenecks.


Your approach looks promising!

Hi


Yes - you can download the workspace at https://tinyurl.com/tms-level-resampler (link valid for 7 days).


John

Badge +1

John,


Any chance you can share this workspace? I'm trying to produce tiles for a huge dataset and I'm running into significant bottlenecks.


Your approach looks promising!

Thank You! Appreciate the quick response

Reply